Tongue & Groove Hardwood Boards
Ipe Tongue & Groove boards are milled with a tongue on one edge and a matching groove on the other, allowing boards to interlock for a tight, seamless fit. Perfect for exterior siding, soffits, covered ceilings, and outdoor flooring where Ipe's legendary durability meets a refined appearance. Also available in Cumaru, Tigerwood, and Garapa.Installation guide • Acclimation tips.
Seamless Fit - Interlocking profile reduces visible gaps
Versatile - Siding, soffit, ceilings, flooring
Available by Species & Grade with live pricing
What is Tongue & Groove Hardwood?
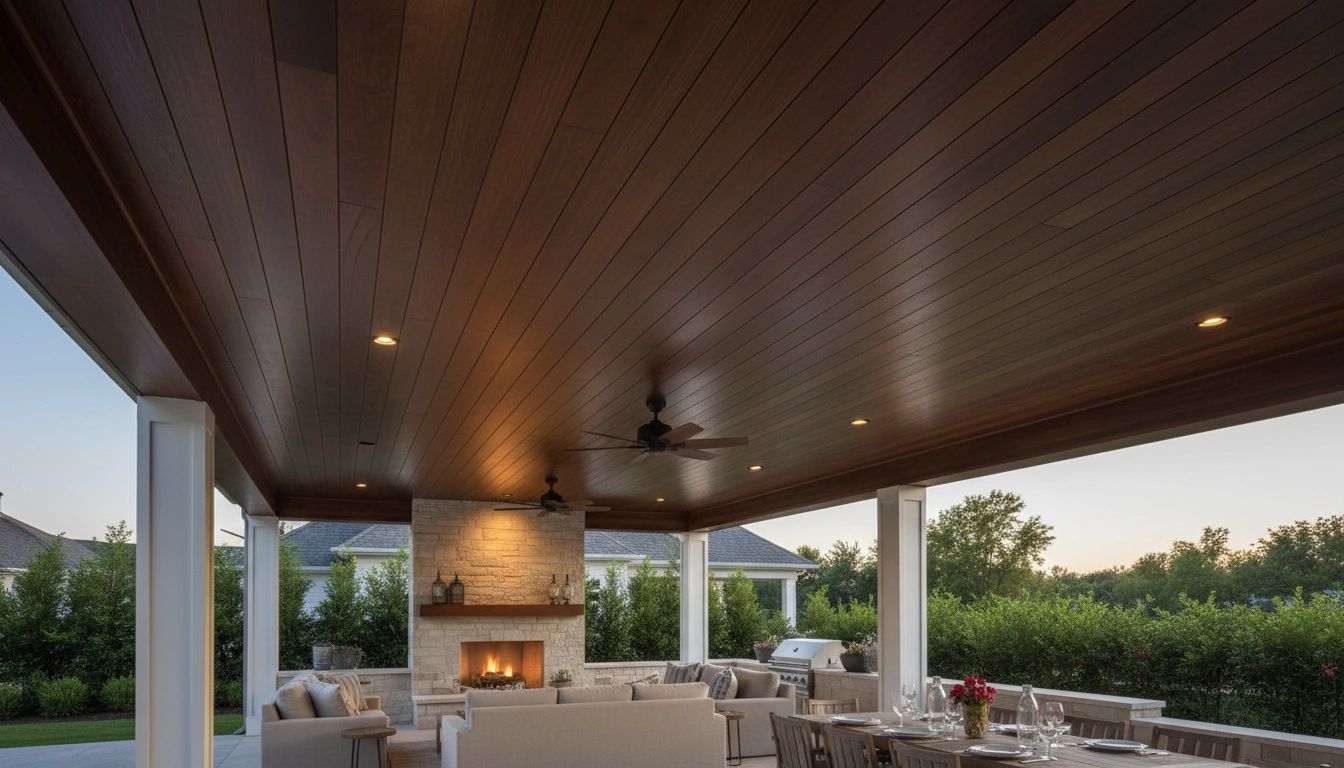
Ipe Tongue & Groove boards combine the legendary durability of Ipe wood with an interlocking profile that creates a tight, seamless fit. Resources from NC State Wood Products Extension confirm interlocking profiles improve moisture management in covered exterior applications. Each board is precision-milled so the tongue of one board fits perfectly into the groove of the next, minimizing visible spacing and delivering a refined, finished appearance. T&G Ipe is ideal for exterior siding, soffit applications, covered ceilings, porches, and outdoor flooring where Ipe's extreme hardness and dimensional stability provide lasting beauty.
Important note: For exterior siding applications, T&G provides excellent weather protection. For ceilings and flooring, T&G is best for covered or protected installations where proper ventilation and acclimation are used. See our installation guide for complete details.
Why Choose Ipe Tongue & Groove
Ipe T&G combines ironwood durability with a seamless interlocking profile for covered installations.
Clean, Seamless Look
Interlocking boards create a tight fit with minimal visible spacing and no visible fasteners
Multiple Applications
Ideal for exterior siding, soffits, covered ceilings, porches, and outdoor flooring
Ipe Durability
Class A fire rating, insect resistance, and 50+ year lifespan
Other Species Available
Also available in Cumaru, Tigerwood, and Garapa
Live Pricing
Select grade and length with instant pricing updates
T&G Applications
Exterior Siding
Tongue & Groove Ipe creates stunning, weather-resistant exterior siding. The interlocking profile provides superior water drainage and prevents moisture intrusion. Perfect for modern or traditional architecture.
Soffit & Eaves
T&G boards create elegant soffit installations with a clean, finished look. The tight-fitting profile ensures proper ventilation while protecting your home's underside from weather and pests.
Covered Ceilings
Create stunning covered porch and patio ceilings. The seamless appearance eliminates visible fasteners while Ipe's natural beauty adds warmth. Must be used in covered areas only to prevent water accumulation.
Installation Specifications
Common T&G Sizes
1x4 Tongue & Groove
Popular for siding, soffit, and standard ceilings
1x6 Tongue & Groove
Ideal for larger siding areas, flooring, high ceilings
5/4 x 4 or 5/4 x 6
Thicker profile for heavy-duty flooring and siding
Custom Sizes Available
We can mill to your exact specifications
Pre-Drill All Fastener Holes
Ipe's density requires pre-drilling to prevent splitting. Blind nail through the tongue at a 45° angle.
Use Stainless Steel Fasteners
Only stainless steel (304 or 316) or coated fasteners. Use finish nails or trim-head screws.
Allow for Proper Ventilation
Ensure adequate airflow above and below the ceiling. Leave appropriate gaps at edges for expansion.
Acclimate 7-14 Days Minimum
Stack boards with spacers in a covered area similar to where they'll be installed.
Important: Application Considerations
For Exterior Siding: T&G provides excellent weather protection when installed vertically or horizontally with proper drainage.
For Ceilings & Flooring: Use only in covered areas. Direct rain exposure can cause water to accumulate in grooves, leading to buckling, swelling, and cupping.
Common Questions
Can I use T&G Ipe for exterior siding?
Yes! T&G Ipe makes excellent exterior siding when installed properly with drainage. The interlocking profile provides superior weather protection and a seamless appearance.
How much does T&G Ipe cost?
T&G Ipe typically ranges from $10-15 per linear foot depending on size, grade, and quantity. Contact us for an exact quote based on your project specifications.
Do I need to seal or stain T&G Ipe?
No sealing is required for protection. Ipe is naturally durable. However, you can apply penetrating oil if you want to maintain the rich brown color instead of allowing it to gray naturally.
Can I use T&G for uncovered applications?
Exterior siding: Yes. Ceilings and flooring: No, must be covered. T&G grooves can trap water in uncovered horizontal applications, but work great for vertical siding.
Available Tongue & Groove Sizes
Shop by size — interlocking T&G boards for siding, soffit, ceilings, and flooring.