Comprehensive Guide on Sanding an Ipe Wood Deck
Revitalize your Ipe deck's appearance and prepare it for sealing
Introduction to Ipe Wood and Sanding
Ipe wood, pronounced "E-pay," is one of the toughest woods globally, offering exceptional resistance to pests, mold, rot, and decay, making it a prime choice for decking material. Its rich brown color, adorned with red and amber hues, enhances any outdoor space, but over time, weathering and wear may necessitate sanding to restore its appearance.
Sanding not only revitalizes the wood's look but also prepares it for sealing, ensuring long-term protection. This guide is tailored for Ipe Woods USA products, leveraging our specific maintenance recommendations to ensure optimal results.
Preparation for Sanding
Clear the Deck
Remove all furniture, planters, and other items from the deck surface to ensure unobstructed access to all areas. This step facilitates thorough sanding and prevents damage to belongings.
Clean the Deck
For best results, pressure wash the deck to remove dirt, mildew, and any old sealant. This initial cleaning is crucial, especially for Ipe wood, which can accumulate oily residues. This ensures that you're sanding a clean surface and prevents clogging of the sanding tool.
Dry Completely
Allow the deck to dry completely before proceeding, typically taking 24-48 hours depending on weather conditions. Never sand wet or damp wood.
Inspect for Damage
Check for deep scratches, splinters, or imperfections that may require more aggressive sanding. Note any areas with significant wear, as these may need additional attention during the process.
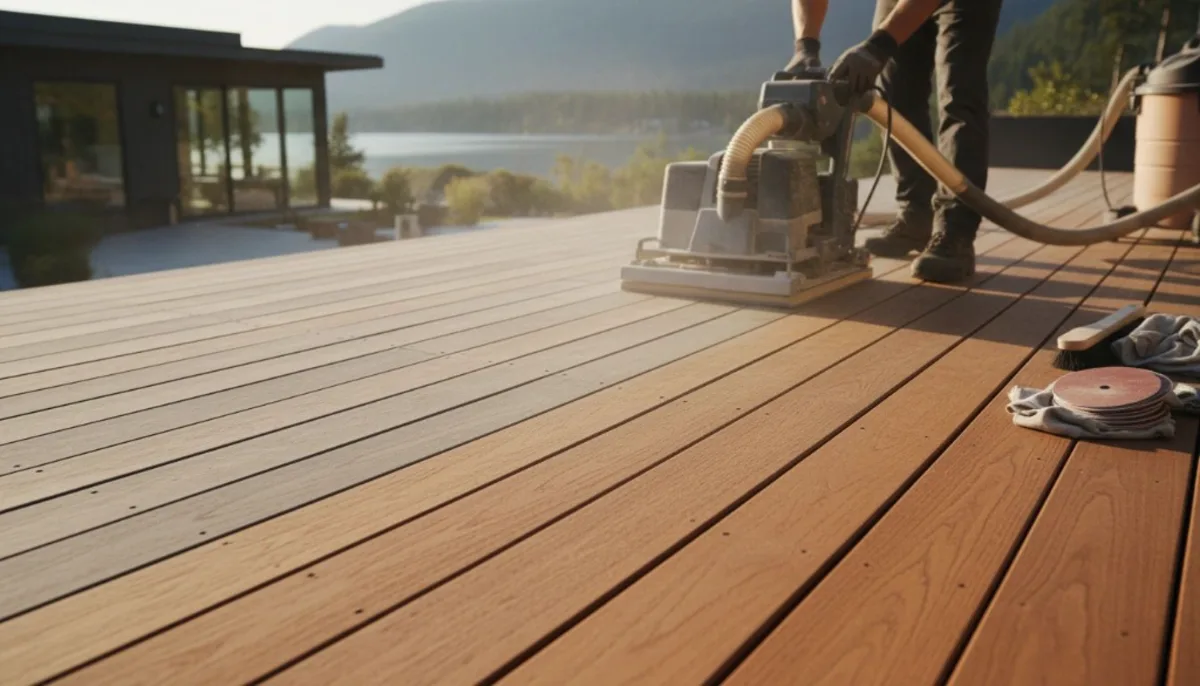
Choosing the Right Tools
Sander
At Ipe Woods USA, we prefer a non-orbital sanding method such as:
- • Belt sander (recommended for best results)
- • Sanding block for hand sanding precision areas
- • Floor sander for very large decks
Note: An orbital sander can work effectively if used with light pressure and careful technique in moderation, though it may leave swirl marks if not used properly.
Sandpaper Grits
For Ipe wood, use sandpaper with a grit range of 60-grit to 80-grit:
- 60-grit: Ideal for heavier sanding tasks, such as removing deep imperfections, old sealant, or restoring weathered surfaces. This coarser grit is suitable for initial passes on areas with significant wear.
- 80-grit: Best for general maintenance and light sanding to smooth the surface after initial sanding, ensuring a fine finish before sealing.
Safety Gear Required
- • Dust mask or respirator - Ipe sanding produces significant dust
- • Safety glasses - Protect eyes from debris
- • Work gloves - Ipe's natural oils may cause skin irritation
- • Ear protection - Power sanders can be loud
Detailed Sanding Process
Attach the Sandpaper
Secure the appropriate grit sandpaper (60-grit for heavier sanding or 80-grit for lighter maintenance) to your chosen sanding tool—preferably a belt sander or sanding block. Ensure it is firmly attached to avoid slippage during use.
Start Sanding
Set the sanding tool on the deck and follow the grain of the wood. Sanding with the grain prevents scratches and ensures a smooth, natural finish. Ipe wood has a tight grain, so aligning with it is crucial for aesthetic results. Use even, light pressure and let the tool do the work—avoid pressing too hard, as this can create uneven surfaces or damage the wood. For larger decks, work in manageable sections, such as 4×4 foot areas, and sand each thoroughly before moving on. If you encounter deep imperfections, start with 60-grit sandpaper for initial removal, then switch to 80-grit for a finer finish.
Avoid Over-Sanding
Do not let the sanding tool sit in one spot for too long, as this can cause uneven sanding and potentially warp the wood over time. Over-sanding in one area can lead to dips or grooves, compromising the deck's structural integrity and appearance. Sand lightly and evenly across the entire surface, ensuring a uniform texture. Given Ipe's density, sanding may take longer than with softer woods like cedar or redwood, so patience is key.
Edges and Corners
For hard-to-reach areas like edges and corners, sand by hand with a sanding block for precision and to avoid swirl marks that power tools might leave. This ensures that all areas, including railings or steps, are smooth and ready for sealing.
Post-Sanding Cleanup
Remove Dust
Thoroughly sweep or vacuum the deck to remove all sanding dust. Leftover dust can clog wood pores and affect sealant adhesion. Use a shop vacuum with brush attachment for best results.
Wipe Down
Use a clean, dry cloth or tack cloth to wipe away any remaining dust or oily residue. Ipe naturally contains oils, so ensuring a clean surface is essential for proper sealing.
Preparing for Sealing
Apply High-Quality Sealant
For Ipe wood, we recommend using a high-quality oil-based sealant specifically designed for hardwoods. These penetrate the wood, enhancing its natural beauty and protecting it from weathering.
If you decide to let it go grey and change your mind later, a light layer of sanding and oil can restore its color.
Additional Considerations and Tips
Patience is Key
Ipe is a dense hardwood, so sanding may take longer than softer woods like cedar or redwood. Take your time to ensure an even finish, and don't rush the process.
Regular Maintenance
Light sanding as part of your routine maintenance can prevent deeper damage and maintain the structural integrity of your deck. This is particularly important for horizontal surfaces, which experience more wear from foot traffic.
Environmental Impact
Ipe wood is sourced from South America, and while it offers exceptional durability, Ipe Woods USA emphasizes responsible sourcing. Check our sustainability practices for peace of mind.
Maintenance Schedule
Regular maintenance, including occasional light sanding every few years, can help prolong your deck's life. If you decide to let it go grey and change your mind, a light layer of sanding and oil can restore its color.
Important Disclaimer
The information provided in this guide is for general informational purposes only. We strongly recommend having an on-site professional, contractor, or experienced carpenter available for personalized advice and to ensure proper technique.
Ipe Woods USA is not liable for any damages, injuries, or issues arising from the use of this guide or improper installation/maintenance practices.